Configure iSCSI connections with MPIO on Windows Server

I would like to install and test Multipath I/O (MPIO) for iSCSI connection. After enabling MPIO for iSCSI connection, we can use all or selected NICs to connect iSCSI target. MPIO can utilize all NICs to transfer data to same destination and then it supports error handling, failover and recovery function by Device-Specific Modules (DSM). By default, the Microsoft DSM is available in Windows Server 2012 and Windows Server 2012 R2.

Microsoft provided the more detail information about MPIO, please read the following web site for your information.
 
Lab environment
  • 1 Windows Server 2012 R2 named DC01 is a domain controller of tls1.local
  • 2 Windows Server 2012 R2 named MS01 and MS02 were joined tls1.local
  • 4 NICs were installed in each server except DC01
  • IP addresses for domain network are 192.168.8.10 (DC01), 192.168.8.21 (MS01) and 192.168.8.22 (MS02)
  • IP addresses for MS01, iSCSI target, are 192.168.9.11, 192.168.9.21 and 192.168.9.31
  • IP addresses for MS02, iSCSI initiator, are 192.168.9.12, 192.168.9.22  and 192.168.9.32
  • Un-check “Register this connection’s addresses in DNS” option for iSCSI network
Installing and configuring iSCSI target
1. On MS01, log in as Domain Administrator.
2. Launch “Server Manager“.
3. On “Server Manager“, click “Add roles and features“.
4. On “Before You Begin” window, click “Next“.
5. On “Installation Type” window, select “Role-based or feature-based installation“.
6. Click “Next“.
7. On “Server Selection” window, click “Next“.
8. On “Server Roles” window, check “iSCSI Target Server” and then click “Add Features“.
9. Click “Next” twice.
10. On “Confirmation” window, click “Install“.
11. On “Results” window, click “Close“.
12. On “Server Manager” window, select “File and Storage Services“.
13. Select “iSCSI“.
14. Click “To create an iSCSI virtual disk, start the New iSCSI Virtual Disk Wizard“.
15. On “iSCSI Virtual Disk Location” window, click “Next“.
16. On “iSCSI Virtual Disk Name” window, next to “Name“, enter “MS02-Lun-0“.
17. Click “Next“.
18. On “iSCSI Virtual Disk Size” window, next to “Size“, enter “30“.
19. Select “Dynamically expanding“.
20. Click “Next“.
Remark: In Windows Server 2012, there is no option to select the types of VHD. In Windows Server 2012 R2, the virtual hard disk format of iSCSI target is VHDX.
21. On “iSCSI Target” window, select “New iSCSI target“, click “Next“.
22. On “Target Name and Access” window, next to “Name“, enter “MS02.tls1.local“.
23. Click “Next“.
24. On “Access Servers” window, click “Add“.
25. On “Add initiator ID” window, select “Enter a value for the selected type“.
26. Next to “Type“, select “IQN“.
27. Next to “Value“, enter “iqn.1991-05.com.microsoft:ms02.tls1.local” the iSCSI initiator of  MS02.
Remark: “iqn.1991-05.com.microsoft” is the default prefix of IQN of Microsoft iSCSI initiator. After entering the prefix, we need to enter the FQDN of the server.
28. Click “OK“.
29. On “Access Servers” window, click “Next“.
30. On “Enable Authentication” window, click “Next“.
31. On “Confirmation” window, click “Create“.
32. On “Results” window, click “Close“.
install MPIO and configure iSCSI initiator in MS02.

Installing MPIO
1. On MS02, log in as Domain Administrator.
2. Launch “Server Manager“.
3. On “Server Manager” window, click “Add roles and features“.
4. On “Before You Begin” window, click “Next“.
5. On “Installation Type” window, select “Roles-based or feature-based installation“.
6. Click “Next“.
7. On “Server Selection” window, click “Next” twice.
8. On “Features” window, check “Multipath I/O“.
9. Click “Next“.
10. On “Confirmation” window, click “Install“.
11. On “Results” window, click “Close“.
12. Press “Start” button and then enter “MPIO“.
13. Click the “MPIO” icon.
14. On “MPIO Properties” window, select “Discover Multi-Paths” tab.
15. Check “Add support for iSCSI devices” and then click “Add“.
16. On “Reboot Required” window, click “Yes” to restart the Windows.
17. After restarting the computer, log in as Domain Administrator and then launch “MPIO“.
Make sure “MSFT2005iSCSIBusType_0x9” was added after restarting the computer.
18. Click “OK“.
Enabling and configuring iSCSI initiator in MS02
After installing MPIO in MS02, we can configure the iSCSI connections.
1. On MS02, press start button and then enter “iSCSI Initiator“.
2. Click “iSCSI Initiator” icon.
3. On “Microsoft iSCSI” window, click “Yes” to enable iSCSI service.
4. On “iSCSI Initiator Properties” window, next to “Target“, enter “ms01.tls1.local“.
5. Click “Quick Connect“.
6. On “Quick Connect” window, click “Done“.
7. Select “Favorite Targets” tab.
8. Click “Remove“.
9. Select “Targets‘ tab.
10. Click “Properties“.
11. On “Properties” window, check the first “Identifier” and then click “Disconnect“.
12. Click “Add session“.
13. On “Connect To Target” window, check “Enable multi-path” and then click “Advanced“.
14. On “Advanced Settings” window, next to “Local adapter“, select “Microsoft iSCSI Initiator“.
15. Next to “Initiator IP“, select “192.168.9.12“.
16. Next to “Target portal IP“, select “192.168.9.11 / 3260“.
17. Click “OK” twice.
18. Repeat step 12 – 17 to add other connections like (192.168.9.22 to 192.168.9.21 and 192.168.9.32 to 192.168.9.31).
19. Click “OK“.
20. Select “Favorite Targets” tab.
21. Select each target and then click “Details” to verify the connection.
Make sure all connections are correct.
22. Click “OK” to close “iSCSI Initiator Properties“.
23. Launch “Server Manager” and then select “File and Storage Services“.
24. Select “Disk“.
The disk is available. The connection was made.
Testing MPIO
I limited the bandwidth of NICs of MS02 to 20Mbps for testing.

I also created a 20GB file, named test.txt, in C drive of MS02 to copy to iSCSI disk, Drive E.

1. On MS02, log in as Domain Administrator.
2. Press “Start” button and then launch “Task Manager“.

3. On “Task Manager” window, click “More details“.

4. Select “Performance” tab.
5. Those NICs are idle at this moment.

6. Launch “Windows Explorer“, copy “test.txt” to E:\.

7. Back to “Task Manager“.

All NICs were utilized because we configured “Enable mutli-path” in iSCSI initiator.

8. Disconnect 1 of NICs in MS02.

1 of NICs was disconnected and then the copying file process stopped. However, the file transfer doesn’t close because MPIO can detect the failed path and try to resubmit the I/O on new paths.

After 30 – 60 seconds, the file transfer were recovered and it is using the new paths to transfer the file.

9. Disconnect 1 of NICs which is transferring the data in MS01.

The copying file process stopped again because MPIO is detecting the failed path and try to resubmit the I/O on new paths.

After 30 – 60 seconds, the file transfer were recovered and it is using a new path to transfer the file.

As a result, the MPIO with iSCSI connections is working.

How to Configure Exchange Server 2010 Outlook Anywhere

In this tutorial I will demonstrate how to enable and configure Exchange Server 2010 Outlook Anywhere to provide secure mailbox connectivity for remote Outlook users.

Outlook Anywhere is a much better solution for remote email access than POP or IMAP because the end user experience is the same when the user is using Outlook on the LAN or remotely. Thanks to SSL encryption Outlook Anywhere is also inherently more secure than other protocols that have non-encrypted options that companies often deploy.

What is Outlook Anywhere?

Outlook Anywhere is a service provided by the Client Access server role that allows Outlook clients to make a secure connection over SSL/HTTPS to the mailbox from remote locations.  Previously this was known as RPC-over-HTTPS but was renamed to Outlook Anywhere in Exchange 2007 and 2010.

By wrapping normal Outlook RPC requests in HTTPS the connections are able to traverse firewalls over the common SSL/HTTPS port without requiring the RPC ports to be opened.

There are three main tasks to deploy Outlook Anywhere in an Exchange environment:

  • Enable and configure Outlook Anywhere on the Client Access server
  • Configure the perimeter firewall to allow SSL/HTTPS connections from external networks to the Client Access server
  • Configure the Outlook clients to use Outlook Anywhere when connecting from remote networks

Enable Outlook Anywhere on Exchange Server 2010

In the Exchange Management Console navigate to Server Configuration -> Client Access, and select the Client Access server you want to enable for Outlook Anywhere.

If you have multiple Client Access servers in an Active Directory site then choose the one that is the internet-facing Client Access server.  Or if you have deployed a CAS array you will need to repeat this process on all members of the array.

Choose the Exchange Server 2010 Client Access Server to configure for Outlook Anywhere

With the server selected, in the action pane of the Exchange Management Console click on Enable Outlook Anywhere.

Enable Outlook Anywhere for Exchange Server 2010

The Enable Outlook Anywhere wizard launches.  Enter the external host name for Outlook Anywhere users to use when connecting remotely to Exchange, and choose an authentication method.

Configure Outlook Anywhere for Exchange Server 2010

The external host name you choose should ideally be one that is already included in the Exchange certificate configured on the Client Access server.  Otherwise you will need to create a new certificate for Exchange.

The Outlook Anywhere authentication method you choose will depend on a few factors in your environment.

  • Basic Authentication – this requires that Outlook users enter their username and password each time they connect to Outlook Anywhere.  The credentials are sent in clear text so therefore it is critical that Outlook Anywhere connections only occur over SSL/HTTPS.  You may need to choose Basic Authentication if the connecting computers are not members of the domain, if the ISA Server publishing rule and listener are shared with other Exchange services that require Basic Authentication, or if the firewall being used does not support NTLM authentication.
  • NTLM Authentication – this is ideal for connecting clients that are domain members because the username and password will not need to be entered by the user each time they connect.  However NTLM may not work with some firewalls or ISA Server publishing scenarios.

When you have configured the Outlook Anywhere settings click Enable to continue, and then click Finish to close the wizard.

The Outlook Anywhere configuration for Exchange 2010 will take effect within 15 minutes of completing the wizard.  The Application Event Log will record Event ID 3008 and a series of other events when the configuration has been applied to the server.

Configure the Firewall for Exchange Server 2010 Outlook Anywhere

To enable remote Outlook users to connect to Outlook Anywhere the perimeter firewall for the network must be configured to allow the SSL/HTTPS connections to pass through to the Client Access server.

The precise steps for this will depend on which firewall you are using in your environment.  However the basic components of this configuration are:

  • A public DNS record for the external host name you are using for Outlook Anywhere
  • A public IP address on the firewall that the public DNS record resolves to
  • A NAT or publishing rule to allow SSL/HTTPS connections to reach the Client Access server
Exchange Server 2010 Outlook Anywhere Firewall Overview

If you are running an internet-facing Exchange Server 2010 CAS array then you would configure the firewall rule to direct traffic to the CAS array IP address.

Configure Outlook Clients for Exchange Server 2010 Outlook Anywhere

Before an Outlook client can connect to Outlook Anywhere it needs to be configured with the correct settings.  In Outlook 2010 open the Account Settings for the Outlook profile that is configured.

Outlook 2010 Account Settings for Exchange Server 2010 Outlook Anywhere

Double-click to open the properties of the Exchange Server profile that is configured.

Outlook 2010 Exchange Server Profile Settings

Click on More Settings, and then select the Connection tab of the settings dialog box that appears.

Outlook 2010 Connection Settings

Tick the box to Connect to Microsoft Exchange using HTTP, and then click the Exchange Proxy Settings button.

Enable Outlook Anywhere in Outlook 2010

Enter the External Host Name that was configured for Outlook Anywhere earlier on the Client Access server, and then configure the Proxy Authentication Settings to match the client authentication method chosen on the server.

Configure the Outlook Anywhere External Host Name and Authentication Settings in Outlook 2010

Click OK, OK, Next and then Finish to apply the change to Outlook 2010.  You must restart Outlook for the new settings to take effect.

Now that Outlook 2010 has been configured for Exchange Server 2010 Outlook Anywhere, any time the user launches Outlook from a remote connection and can reach the perimeter firewall over the internet they will be able to securely access their mailbox as though they were still on the corporate network.

Windows Dynamic Access Control (DAC)

  • Active Directory management enhancements
    • Active Directory Administrative Center
      • Active Directory Recycle Bin management
      • Fine-Grained Password Policy management
      • Windows PowerShell History Viewer
      • Dynamic Access Control
    • Group Policy enhancements
    • Kerberos constrained delegation changes
  • Active Directory deployment enhancements
    • Remote DCPromo and built-in troubleshooting
    • ADPrep integration
    • Improved virtualization support
      • Domain controller cloning
      • Active Directory snapshots
  • Active Directory-based activation
    • Active Directory Federation Services 2.1 built in

In this post we will concentrate on Dynamic Access Control (DAC). DAC allows administrators to create and manage central access and audit policies in Active Directory, which can be managed through the AD Administrative Console to help organizations reach data compliance.

**NOTE: DAC is the amalgamation of different features working together. It leverage AD, GPO, File Servers … It is one the more involved Labs we have tackled so far.

Microsoft has focused on the following areas:

  • Identify the information that needs to be managed to meet business and compliance requirements
  • Apply appropriate access policies to information
  • Audit access to information
  • Encrypt information

You can now create and managed Central Access and Audit Policies in Active Directory through the ADAC . These policies are based on conditional expressions that take into account the following so that organizations can translate business requirements to efficient policy enforcement and considerably reduce the number of security groups needed for access control:

  • Who the user is
  • What device they are using, and
  • What data is being accessed

Dynamic Access Control integrates claims into Windows authentication (Kerberos) so that users and devices can be described not only by the security groups they belong to, but also by claims such as: “User is from the Finance department” and “User’s security clearance is High”

Here is a sample usage of DAC

Policy Type Usage
Organization-wide authorization policy
  • Most commonly initiated from the information security office
  • Driven by compliance or a high-level organization requirements
  • Relevant across the organization.
  • Example: HBI files are accessible to only full-time employees
Departmental authorization policy
  • Each department in an organization has some special data-handling requirements that they want to enforce
  • Example: the finance department might want to limit access to finance servers to the finance employees
Specific data-management policy
  • Usually relates to compliance and business requirements, and is targeted at protecting the correct access to the information that is being managed
  • Example: financial institutions might implement information walls so that analysts do not access brokerage information and brokers do not access analysis information
Need-to-know policy
  • Typically used in conjunction with the previous policy types
  • Example: vendors should be able to access and edit only files that pertain to a project they are working on

You king find different scenarios of DAC usage here.

What we will do in this post is setup DAC and create a rule to show the flexibility and the value you can get from this technology.

Step-by-Step: enabling and configuring DAC

DAC is a claim based security feature.

Claims are Active Directory attributes defined to be used with Central Access Policies. The claims can be set for both users and devices. Microsoft added a new container to the Active Directory Administrative Center to implement this new feature.

To configure centralized file-access policies through Dynamic Access Control, we need to configure the following parts.

  1. Claim Type
  2. Resource properties for files
  3. Resource property lists ( add resource property to global)
  4. Create new central access rule
  5. Create central access policy

First, we logged on our domain controller ITCamp-DC1 and created some accounts for this lab.

  1. Create the following users with the attributes indicated:
 User Username Email address Department Country/Region
Myriam Delesalle MDelesalle MDelesalle@ITCAMP.Local Finance Canada
Miles Reid MReid MReid@ITCAMP.Local Finance United States
Esther Valle EValle EValle@ITCAMP.Local Operations Canada
Maira Wenzel MWenzel MWenzel@ITCAMP.Local HR Canada
Jeff Low JLow JLow@ITCAMP.Local HR United States

It’s now time to enable Dynamic Access Control for ITCamp.Local

  1. Open the Group Policy Management Console, click ITCamp.Local, and then double-click Domain Controllers.
  2. Right-click Default Domain Controllers Policy, and select Edit.
  3. In the Group Policy Management Editor window, double-click Computer Configuration, double-click Policies, double-click Administrative Templates, double-click System, and then double-click KDC.
  4. Double-click KDC support for claims, compound authentication, and Kerberos armoring and select the option next to Enabled. You need to enable this setting to use Central Access Policies.
  5. Open an elevated command prompt, and run the following command:

gpupdate /force

Configure Claim Type

In this step we will configure Claim type for Users. We will add existing Active Directory attributes to the list of attributes that we can use when evaluating dynamic access control. In our case, the user’s department and his country

1- After login to the DC , you can just open the Active Directory Administrative Center to start configuring the Dynamic Access Policy (DAP).

image

2- In the Claim Type Section, click “New” and “Claim Type” in the task pane,

image

3- Select the attribute you want to use, in our case “c” and in the suggested value section define the countries you want to define. In our Lab we will look for Canada and United States.

image

4- Repeat for the department attribute with the following suggested value. (HR, Finance, Operations)

Configure Resource properties for files

1- In this step, we will configure the properties which will be downloaded by file servers and used to classify files or directories or shares. The DAC rules will compare user attribute values with resource properties. You can enable existing properties or create new ones.

image

2- Click on resource property and here you can select the existing resource properties or also you can create the new ones, I have selected Country and Department.

image

Resource property lists (add resource property to global)

1- Each resource property must be added to at least one resource property list. It will then be downloaded by file servers in your environment. The global resource property list is downloaded by all file servers.

image

Our properties are already part of the global list.

Create new central access rule

This is when we create a Rule that uses the properties we have defined earlier. This describes which conditions must be met in order for file access to be granted.

1- In the Central Access Rule section, click “New” and “Central Access Rule”

image

2- Give it a name in the Create Central Access Rule form.

image

3- In the Permission section, click “Use Following Permissions” and click “Edit”

image

4- Click “Add” and in the following “permission Entry for Permissions” select The “Authenticated User” as the principal and set the following conditions.

image

5- Click “OK” you are back to the DAC configuration screen.

Create central access policy

This part is very straight forward.

1- In the Central Access Policy, click “New” and “Central Access Policy” and give the new policy a name in the “Create Central Access Policy” form. We named our CAP. You also need to Add the Central Access Rule you created earlier to the policy.

image

2- Once that is created we need to tell AD about the policy. In the “Group Policy Management Console” we edited the “Default domain policy” but you can apply a different policy as you see fit. And in the Computer ManagementàPoliciesàWindows SettingsàSecurity settingsàFile SystemàCentral Access Policy, right-click the right pane and select manage Central Access Policy.

image

3- Add the Policy you created to the Applicable Central Access Policies.

image

We are done configuring the DAC… well… not quite. We still need to configure our shares and share properties.

To configure the shares the File Server Resource Manager must be installed on the server that will be used as the files server. In our case the file server we are using is VMHost10B.itcamp.local.

  1. Logon VMHost10B.itcamp.local as itcamp\administrator
  2. In Server Manager, click Add Roles and Features.
  3. On the Before you begin page, click Next.
  4. On the Select installation type page, click Next.
  5. On the Select destination server page, click Next.
  6. On the Select Server Roles page, expand File and Storage Services, select the check-box next to File and iSCSI Services, expand, and select File Server Resource Manager.
  7. In the Add Roles and Features Wizard, click Add Features, and then click Next.
  8. On the Select features page, click Next.
  9. On the Confirm installation selections page, click Install.
  10. On the Installation progress page, click Close

On the VMHost10B machine we created 2 SMB Shares-Advanced shares. (HR, Finance) select all defaults to complete this part.

Once the shares have been created, we need to go the location where the directory has been created and modify the properties of each folders.

image

To include the classification of these folders.

image

And in the advanced Security Settings, in the Central Policy Tab, change the “No central Access Policy” to “CAP” the policy we defined.

You can test to see if everything worked well by using the effective Access tab.

image

That is that start of the value that DAC can bring

Lock Down Remote Desktop Services Server 2012 / RDS 2012 R2

This article describes some basic Group Polices to get you started configuring RDS Server.

Preparation

Create OU for RDS Server in Active Directory. Create security group for users who will use Remote Desktop Host (i.e. RDS Users). Create GPO (i.e. RDS Server Lock Down). In Security Filtering delete Authenticated Users, add RDS Server Computer Account, and the security group created in previous step.

Configure users who can connect to the server remotely:

Log in to RDS Server >>> Run >>> control system >>> Remote Settings >>> Remote tab >>> Select users >>> Delete any groups/users >>> Add security group for RDS users

Disable Server Manager Pop Up at user log on:

On RDS Server open Task Scheduler. Navigate to Task Scheduler Library\Microsoft\Windows\Server Manager. Disable task “ServerManager” which triggers at log on of any user.

Some group policies might not be available in your group policy manager. You will need to add Administrative Templates for the Windows 8.1 and Windows Server 2012 R2: see Adding Windows 8.1 and Server 2012 R2 Administrative Templates. 

Configure Group Policy for RDS Server Lock Down

Loopback Processing

[Computer Configuration\Policies\Administrative Templates\System\Group Policy]

Configure user Group Policy loopback processing mode: Enable – Merge

This policy setting directs the system to apply the set of Group Policy objects for the computer to any user who logs on to a computer affected by this setting. It is intended for special-use computers, such as those in public places, laboratories, and classrooms, where you must modify the user setting based on the computer that is being used.
If you enable this setting, you can select one of the following modes from the Mode box:
“Replace” indicates that the user settings defined in the computer’s Group Policy Objects replace the user settings normally applied to the user.
“Merge” indicates that the user settings defined in the computer’s Group Policy Objects and the user settings normally applied to the user are combined. If the settings conflict, the user settings in the computer’s Group Policy Objects take precedence over the user’s normal settings.


Disable Control Panel Items

[User Configuration\Policies\Administrative Templates\Control Panel]

Hide specified Control Panel items: Enable

This setting allows you to display or hide specified Control Panel items, such as Mouse, System, or Personalization, from the Control Panel window and the Start screen. The setting affects the Start screen and Control Panel window, as well as other ways to access Control Panel items, such as shortcuts in Help and Support or command lines that use control.exe. This policy has no effect on items displayed in PC settings.
If you enable this setting, you can select specific items not to display on the Control Panel window and the Start screen.
To hide a Control Panel item, enable this policy setting and click Show to access the list of disallowed Control Panel items. In the Show Contents dialog box in the Value column, enter the Control Panel item’s canonical name. For example, enter Microsoft.Mouse, Microsoft.System, or Microsoft.Personalization.

Add following items to the disallowed Control Panel items:
Microsoft.AdministrativeTools
Microsoft.AutoPlay
Microsoft.ActionCenter
Microsoft.ColorManagement
Microsoft.DefaultPrograms
Microsoft.DeviceManager
Microsoft.EaseOfAccessCenter
Microsoft.FolderOptions
Microsoft.iSCSIInitiator
Microsoft.NetworkAndSharingCenter
Microsoft.NotificationAreaIcons
Microsoft.PhoneAndModem
Microsoft.PowerOptions
Microsoft.ProgramsAndFeatures
Microsoft.System
Microsoft.TextToSpeech
Microsoft.UserAccounts
Microsoft.WindowsFirewall
Microsoft.WindowsUpdate
Microsoft.DateAndTime
Microsoft.RegionAndLanguage
Microsoft.RemoteAppAndDesktopConnections
Install Application On Remote Desktop Server
Java
Flash Player


Remove Administrative Tools and Powershell

Restrict access to Administrative tools

  • Open RDS Lock Down Group Policy.
  • Navigate to Computer Configuration >>> Policies >>> Windows Settings >>> Security Settings
  • Right click on File System, choose Add File… .
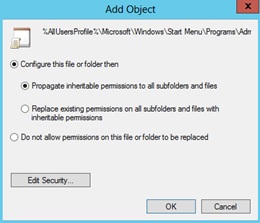
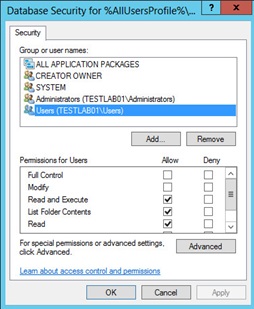
  • In the Add a file or folder window, put %AllUsersProfile%\Microsoft\Windows\Start Menu\Programs\Administrative Tools in the Folder field and click OK.


  • On the next window Database Security for %AllUsersProfile%\Microsoft\Windows\Start Menu\Programs\Administrative Tools\Server Manager.lnk remove Users and check that Administrators have Full Access

Database Security for Server Manager.lnk

  • On the Add Object window choose Configure this file or folder then Propagate inheritable permissions to all subfolders and files. Click OK.

Add Object

  • Do the same for PowerShell shortcut (+ delete Creator Owner in database security): %AllUsersProfile%\Microsoft\Windows\Start Menu\Programs\System Tools\Windows PowerShell.lnk
  • Do the same for Server Manager shortcut: %AllUsersProfile%\Microsoft\Windows\Start Menu\Programs\Administrative Tools\Server Manager.lnk

File Explorer Configuration

[User Configuration\Policies\Administrative Templates\Windows Components\File Explorer]

Enable – Restrict A, B, C and D drives only: Hide these specified drives in My Computer

This policy setting allows you to hide these specified drives in My Computer. This policy setting allows you to remove the icons representing selected hard drives from My Computer and File Explorer. Also, the drive letters representing the selected drives do not appear in the standard Open dialog box. If you enable this policy setting, select a drive or combination of drives in the drop-down list.

Enable – Remove Hardware tab

This setting removes the Hardware tab from Mouse, Keyboard, and Sounds and Audio Devices in Control Panel. It also removes the Hardware tab from the Properties dialog box for all local drives, including hard drives, floppy disk drives, and CD-ROM drives. As a result, users cannot use the Hardware tab to view or change the device list or device properties, or use the Troubleshoot button to resolve problems with the device.

Enable – Hides the Manage item on the File Explorer context menu

Removes the Manage item from the File Explorer context menu. This context menu appears when you right-click File Explorer or My Computer.

Enable – Remove Security tab

Removes the Security tab from File Explorer. If you enable this setting, users opening the Properties dialog box for all file system objects, including folders, files, shortcuts, and drives, will not be able to access the Security tab. As a result, users will be able to neither change the security settings nor view a list of all users that have access to the resource in question.

Disable Registry Modification

[User Configuration\Policies\Administrative Templates\System]

Enable – Prevent access to registry editing tools

Disables the Windows registry editor Regedit.exe. If you enable this policy setting and the user tries to start Regedit.exe, a message appears explaining that a policy setting prevents the action.


Configure Windows Installer and Windows Updates

[Computer Configuration\Policies\Administrative Templates\Windows Components\Windows Installer]

Enable: Prevent users from using Windows Installer to install updates and upgrades

This policy setting prevents users from using Windows Installer to install patches. If you enable this policy setting, users are prevented from using Windows Installer to install patches. Patches are updates or upgrades that replace only those program files that have changed. Because patches can be easy vehicles for malicious programs, some installations prohibit their use.

 Enable Always: Turn off Windows Installer

This policy setting restricts the use of Windows Installer. If you enable this policy setting, you can prevent users from installing software on their systems or permit users to install only those programs offered by a system administrator. You can use the options in the Disable Windows Installer box to establish an installation setting.

[Computer Configuration\Administrative Templates\Windows Components\Windows Update]

Enable: Do not display ‘Install Updates and Shut Down’ option

This policy setting prevents users from using Windows Installer to install patches. If you enable this policy setting, users are prevented from using Windows Installer to install patches. Patches are updates or upgrades that replace only those program files that have changed. Because patches can be easy vehicles for malicious programs, some installations prohibit their use.

[Computer Configuration\Administrative Templates\Windows Components\Windows Update]

Enable: Do not display ‘Install Updates and Shut Down’ option

This policy setting allows you to manage whether the ‘Install Updates and Shut Down’ option is displayed in the Shut Down Windows dialog box.

 Disable: Allow non-administrators to receive update notifications

This policy setting allows you to control whether non-administrative users will receive update notifications based on the “Configure Automatic Updates” policy setting.

Additional Policies

[Computer Configuration\Policies\Administrative Templates\Windows Components\Remote Desktop Services\Remote Desktop Session Host\Session Time Limits]

Enable (i.e. 30 minutes): Set time limit for disconnected sessions

You can use this policy setting to specify the maximum amount of time that a disconnected session remains active on the server. By default, Remote Desktop Services allows users to disconnect from a Remote Desktop Services session without logging off and ending the session.

 When a session is in a disconnected state, running programs are kept active even though the user is no longer actively connected. By default, these disconnected sessions are maintained for an unlimited time on the server.

 If you enable this policy setting, disconnected sessions are deleted from the server after the specified amount of time. To enforce the default behavior that disconnected sessions are maintained for an unlimited time, select Never. If you have a console session, disconnected session time limits do not apply.

[Computer Configuration/Policies/Administrative Templates/Windows Components/Remote Desktop Services/Remote Desktop Connection/Remote Desktop Session Host/Session Time Limits]

Set time limit for logoff of RemoteApp sessions: Enable (i.e. logoff delay 1 hour)

This policy setting allows you to specify how long a user’s RemoteApp session will remain in a disconnected state after closing all RemoteApp programs before the session is logged off from the RD Session Host server.

By default, if a user closes a RemoteApp program, the session is disconnected from the RD Session Host server, but it is not logged off.

If you enable this policy setting, when a user closes the last running RemoteApp program associated with a session, the RemoteApp session will remain in a disconnected state until the time limit that you specify is reached. When the time limit specified is reached, the RemoteApp session will be logged off from the RD Session Host server. If the user starts a RemoteApp program before the time limit is reached, the user will reconnect to the disconnected session on the RD Session Host server.

If you disable or do not configure this policy setting, when a user closes the last RemoteApp program, the session will be disconnected from the RD Session Host server but it is not logged off.

Note: This policy setting appears in both Computer Configuration and User Configuration. If both policy settings are configured, the Computer Configuration policy setting takes precedence.

 [Computer Configuration/Policies/Administrative Templates/Windows Components/Remote Desktop Services/Remote Desktop Connection/Remote Desktop Session Host/Session Time Limits]

Set time limit for active but idle Remote Desktop Services sessions: Enable ( i.e. 1 hour)

This policy setting allows you to specify the maximum amount of time that an active Remote Desktop Services session can be idle (without user input) before it is automatically disconnected.

If you enable this policy setting, you must select the desired time limit in the Idle session limit list. Remote Desktop Services will automatically disconnect active but idle sessions after the specified amount of time. The user receives a warning two minutes before the session disconnects, which allows the user to press a key or move the mouse to keep the session active. If you have a console session, idle session time limits do not apply.

If you disable or do not configure this policy setting, the time limit is not specified at the Group Policy level. By default,  Remote Desktop Services allows sessions to remain active but idle for an unlimited amount of time.

If you want Remote Desktop Services to end instead of disconnect a session when the time limit is reached, you can configure the policy setting Computer Configuration\Administrative Templates\Windows Components\Remote Desktop Services\Remote Desktop Session Host\Session Time Limits\End session when time limits are reached.

 [User Configuration/Policies/Administrative Templates/Start Menu and Taskbar]

Go to the desktop instead of Start when signing in or when all the apps on a screen are closed: Enable

This policy setting allows users to go to the desktop instead of the Start screen when they sign in, or when all the apps on a screen are closed.  This policy setting applies to all versions of Windows, and versions of Windows Server with the Desktop Experience installed.

If you enable this policy setting, users will always go to the desktop when they sign in, or when all the apps on a screen are closed.

 [User Configuration/Policies/Administrative Templates/Start Menu and Taskbar]

Remove the Action Center icon: Enable

This policy setting allows you to remove the Action Center from the system control area.

If you enable this policy setting, the Action Center icon is not displayed in the system notification area.

If you disable or do not configure this policy setting, the Action Center icon is displayed in the system notification area.

 [User Configuration/Policies/Administrative Templates/Windows Components/Windows Update]

Remove access to use all Windows Update features: Enable (0 = Do not show any notifications)

This setting allows you to remove access to Windows Update.

If you enable this setting, all Windows Update features are removed. This includes blocking access to the Windows Update Web site at http://windowsupdate.microsoft.com, from the Windows Update hyperlink on the Start menu, and also on the Tools menu in Internet Explorer. Windows automatic updating is also disabled; you will neither be notified about nor will you receive critical updates from Windows Update. This setting also prevents Device Manager from automatically installing driver updates from the Windows Update Web site.

If enabled you can configure one of the following notification options:

0 = Do not show any notifications

This setting will remove all access to Windows Update features and no notifications will be shown.

1 = Show restart required notifications

This setting will show notifications about restarts that are required to complete an installation.

[User Configuration/Policies/Administrative Templates/Windows Components/File Explorer]

Remove CD Burning features: Enable

This policy setting allows you to remove CD Burning features. File Explorer allows you to create and modify re-writable CDs if you have a CD writer connected to your PC.

If you enable this policy setting, all features in the File Explorer that allow you to use your CD writer are removed.

If you disable or do not configure this policy setting, users are able to use the File Explorer CD burning features.

Note: This policy setting does not prevent users from using third-party applications to create or modify CDs using a CD writer.

[User Configuration/Policies/Administrative Templates/Windows Components/File Explorer]

Prevent access to drives from My Computer: Enable (choose the drives)

Prevents users from using My Computer to gain access to the content of selected drives.

If you enable this setting, users can browse the directory structure of the selected drives in My Computer or File Explorer, but they cannot open folders and access the contents. Also, they cannot use the Run dialog box or the Map Network Drive dialog box to view the directories on these drives.

To use this setting, select a drive or combination of drives from the drop-down list. To allow access to all drive directories, disable this setting or select the “Do not restrict drives” option from the drop-down list.

Note: The icons representing the specified drives still appear in My Computer, but if users double-click the icons, a message appears explaining that a setting prevents the action.

 Also, this setting does not prevent users from using programs to access local and network drives. And, it does not prevent them from using the Disk Management snap-in to view and change drive characteristics.

[User Configuration/Policies/Administrative Templates/Windows Components/Credentials User Interface]

Do not display the password reveal button: Enable

This policy setting allows you to configure the display of the password reveal button in password entry user experiences.

If you enable this policy setting, the password reveal button will not be displayed after a user types a password in the password entry text box.

If you disable or do not configure this policy setting, the password reveal button will be displayed after a user types a password in the password entry text box.

By default, the password reveal button is displayed after a user types a password in the password entry text box. To display the password, click the password reveal button.

The policy applies to all Windows components and applications that use the Windows system controls, including Internet Explorer.

[User Configuration/Policies/Administrative Templates/Windows Components/AutoPlay Policies]

Turn off Autoplay: Enable (CD-ROM and removable media drives)

This policy setting allows you to turn off the Autoplay feature.

Autoplay begins reading from a drive as soon as you insert media in the drive. As a result, the setup file of programs and the music on audio media start immediately.

Prior to Windows XP SP2, Autoplay is disabled by default on removable drives, such as the floppy disk drive (but not the CD-ROM drive), and on network drives.

Starting with Windows XP SP2, Autoplay is enabled for removable drives as well, including Zip drives and some USB mass storage devices.

If you enable this policy setting, Autoplay is disabled on CD-ROM and removable media drives, or disabled on all drives.

This policy setting disables Autoplay on additional types of drives. You cannot use this setting to enable Autoplay on drives on which it is disabled by default.

If you disable or do not configure this policy setting, AutoPlay is enabled.

Note: This policy setting appears in both the Computer Configuration and User Configuration folders. If the policy settings conflict, the policy setting in Computer Configuration takes precedence over the policy setting in User Configuration.

[User Configuration/Policies/Administrative Templates/Windows Components/Remote Desktop Services/Remote Desktop Connection]

Do not allow passwords to be saved: Enable

Controls whether a user can save passwords using Remote Desktop Connection.

If you enable this setting the credential saving checkbox in Remote Desktop Connection will be disabled and users will no longer be able to save passwords. When a user opens an RDP file using Remote Desktop Connection and saves his settings, any password that previously existed in the RDP file will be deleted.

If you disable this setting or leave it not configured, the user will be able to save passwords using Remote Desktop Connection

Upload VHD to Azure

In this article:

This article shows you how to upload a virtual hard disk (VHD) with an operating system so you can use it as an image to create virtual machines based on that image. For more information about disks and images in Microsoft Azure, see About Disks and Images in Azure.

Prerequisites

This article assumes you have the following:

  1. An Azure subscription – If you don’t have one, you can open an Azure account for free: You get credits you can use to try out paid Azure services, and even after they’re used up you can keep the account and use free Azure services, such as Websites. Your credit card will never be charged, unless you explicitly change your settings and ask to be charged. You also can activate MSDN subscriber benefits: Your MSDN subscription gives you credits every month that you can use for paid Azure services.
  2. Microsoft Azure PowerShell – You have the Microsoft Azure PowerShell module installed and configured to use your subscription. To download the module, see Microsoft Azure Downloads. A tutorial to install and configure the module is available here. You’ll use the Add-AzureVHD cmdlet to upload the VHD.
  3. A supported Windows operating system stored in a .vhd file – You have installed a supported Windows Server operating system to a virtual hard disk. Multiple tools exist to create .vhd files. You can use a virtualization solution such as Hyper-V to create a virtual machine and install the operating system. For instructions, see Install the Hyper-V Role and Configure a Virtual Machine.

The following Windows Server versions are supported:

OS SKU Service Pack Architecture
Windows Server 2012 R2 All editions N/A x64
Windows Server 2012 All editions N/A x64
Windows Server 2008 R2 All editions SP1 x64

This task includes the following steps:

Step 1: Prepare the image to be uploaded

Before you can upload the image to Azure, you need to generalize it by using the Sysprep command. For more information about Sysprep, see How to Use Sysprep: An Introduction.

From the virtual machine that the operating system was installed to, complete the following procedure:

  1. Log in to the operating system.
  2. Open a Command Prompt window as an administrator. Change the directory to %windir%\system32\sysprep, and then run sysprep.exe.

    Open Command Prompt window

  3. The System Preparation Tool dialog box appears.

    Start Sysprep

  4. In the System Preparation Tool, select Enter System Out of Box Experience (OOBE) and make sure that Generalize is checked.
  5. In Shutdown Options, select Shutdown.
  6. Click OK.

Step 2: Create a storage account in Azure

You need a storage account in Azure to upload a .vhd file so it can be used in Azure to create a virtual machine. You can use the Azure Management Portal to create a storage account.

  1. Sign in to the Azure Management Portal.
  2. On the command bar, click New.
  3. Click Data Services > Storage > Quick Create.

    Quick create a storage account

  4. Fill out the fields as follows:
    • Under URL, type a subdomain name to use in the URL for the storage account. The entry can contain from 3-24 lowercase letters and numbers. This name becomes the host name within the URL that is used to address Blob, Queue, or Table resources for the subscription.
    • Choose the location or affinity group for the storage account. An affinity group lets you place your cloud services and storage in the same data center.
    • Decide whether to use geo-replication for the storage account. Geo-replication is turned on by default. This option replicates your data to a secondary location, at no cost to you, so that your storage fails over to that location if a major failure occurs at the primary location. The secondary location is assigned automatically, and can’t be changed. If you need more control over the location of your cloud-based storage due to legal requirements or organizational policy, you can turn off geo-replication. However, be aware that if you later turn on geo-replication, you will be charged a one-time data transfer fee to replicate your existing data to the secondary location. Storage services without geo-replication are offered at a discount. More details on managing geo-replication of Storage accounts can be found here: Create, manage, or delete a storage account.

    Enter storage account details

  5. Click Create Storage Account. The account now appears under Storage.

    Storage account successfully created

  6. Next, create a container for your uploaded VHDs. Click the storage account name and then click Containers.

    Storage account detail

  7. Click Create a Container.

    Storage account detail

  8. Type a Name for your container and select the Access policy.

    Container name

Step 3: Prepare the connection to Microsoft Azure

Before you can upload a .vhd file, you need to establish a secure connection between your computer and your subscription in Azure. You can use the Microsoft Azure Active Directory method or the certificate method to do this.

Use the Microsoft Azure AD method

  1. Open the Azure PowerShell console.
  2. Type:
    Add-AzureAccount

    This command opens a sign-in window so you can sign with your work or school account.

    PowerShell Window

  3. Azure authenticates and saves the credential information, and then closes the window.

Use the certificate method

  1. Open the Azure PowerShell console.
  2. Type: Get-AzurePublishSettingsFile.
  3. A browser window opens and prompts you to download a .publishsettings file. It contains information and a certificate for your Microsoft Azure subscription.

    Browser download page

  4. Save the .publishsettings file.
  5. Type: Import-AzurePublishSettingsFile <PathToFile>

    Where <PathToFile> is the full path to the .publishsettings file.

Step 4: Upload the .vhd file

When you upload the .vhd file, you can place the .vhd file anywhere within your blob storage. In the following command examples, BlobStorageURL is the URL for the storage account that you created in Step 2, YourImagesFolder is the container within blob storage where you want to store your images. VHDName is the label that appears in the Management Portal to identify the virtual hard disk. PathToVHDFile is the full path and name of the .vhd file.

  1. From the Azure PowerShell window you used in the previous step, type:

    Add-AzureVhd -Destination "<BlobStorageURL>/<YourImagesFolder>/<VHDName>.vhd" -LocalFilePath <PathToVHDFile>

    PowerShell Add-AzureVHD

    For more information about the Add-AzureVhd cmdlet, see Add-AzureVhd.

Step 5: Add the Image to Your List of Custom Images

After you upload the .vhd, you add it as an image to the list of custom images associated with your subscription.

  1. From the Management Portal, under All Items, click Virtual Machines.
  2. Under Virtual Machines, click Images.
  3. And then click Create an Image.

    PowerShell Add-AzureVHD

  4. In Create an image from a VHD, do the following:
    • Specify name
    • Specify description
    • To specify the URL of your VHD, click the folder button to open the following window:

    Select VHD – Select the storage account your VHD is in and click Open. This returns you to the Create an image from a VHD window. – After you return to the Create an image from a VHD window, select the Operating System Family. – Check I have run Sysprep on the virtual machine associated with this VHD to acknowledge that you generalized the operating system in Step 1, and then click OK.

    Add Image

  5. OPTIONAL : You can the Add-AzureVMImage cmdlet instead of the Management Portal to add your VHD as an image. In the Azure PowerShell console, type:

    Add-AzureVMImage -ImageName <Your Image's Name> -MediaLocation <location of the VHD> -OS <Type of the OS on the VHD>

    PowerShell Add-AzureVMImage

  6. After you complete the previous steps, the new image is listed when you choose the Images tab.

    custom image

    This new image is now available under My Images when you create a virtual machine. For instructions, see How to Create a Custom Virtual Machine Running Windows.

    create VM from custom image

Azure Site Recovery

Deploying Microsoft Azure Site Recovery Manager to replicate and failover virtual machines on Hyper-V host servers that are located in System Center Virtual Machine Manager (VMM) clouds. It’s not Microsoft Hyper-V alone protection anymore, they have managed to protect VMWare and Physical Servers on Primary Sites too.

SCVMM to AzureSCVMM 2012 R2 to Azure


ASR Start Configs

Microsoft Azure Site Recovery Quick Start

On April 30, 2015. You could choose from the Quick Start page the following configurations :

  • Between an On-Premises VMM Site and Azure
  • Between Two On-Premises VMM Sites
  • Between an On-Premises Hyper-V Site and Azure
  • Between Two On-Premises VMWare Sites
  • Between Two On-Premises VMM Sites with SAN Array Replication.

I choose the first one, Microsoft System Center 2012 R2 Virtual Machine Manager RU6 and Microsoft Azure.
Before we begin :  information about Azure Site Recovery prerequisites and supported scenarios. 

When Your Microsoft Azure Subscription is Active and you have created a Storagepool in Azure, you can follow the next step.


ASR1

Quick Create a Site Recovery Vault by giving it a Name and choose a Region

ASR2

This is my Azure Site Recovery called HybridCloud

From here start the Quick Start Page of your Azure Site Recovery Vault by clicking on

Quickstart


Choose option

I Choose for SCVMM to Azure

Step1

Just Click on the links for a Registration key and the SCVMM Provider Software

ASR3ASR4Click on Install

ASR5

Set the Proxy settings when you behind an Proxy Server

ASR9

Browse to your downloaded Registration key of the Azure Site Recovery

ASR10

Give the directory path for the Certificate

ASR11

Registration software in SCVMM is completed

ASR12

Here you see your SCVMM Server in the Azure Site Recovery Vault

ASR13

In System Center 2012 R2 Virtual Machine Manager RU6 is ASR also Active

Next Step is to install the ASR Agent on Hyper-V :

ASR Agent 1a

Choose your Cache Location with Enough Storage

ASR Agent 2

Set your Proxy Settings and Click Next

ASR Agent 3

Click Install

ASR Agent 4

Click on Proceed to Registration

ASR Agent 5

Next Step in Virtual Machine Manager

If you don’t have your Virtual Machines in a SCVMM Cloud, you have to make Cloud(s) with Virtual Machine Manger.
The next step is to make a Cloud if you don’t have any.

Create Cloud

ASR14

Give your Private Cloud a Name and Mark the Checkbox for ASR Protection

ASR15

Select your Resources

ASR16

Choose the right network

ASR17

Click Next

ASR18

Choose the right Storage pool(s) for this Cloud

ASR19

Check the Summary and make your Private Cloud with SCVMM

ASR20

When you have a VM in your Cloud Click on Manage Protection

ASR24

Select the Replication settings

ASR22

The SCVMM Cloud is in the Azure Recovery Site

ASR23

Configure now the network Maps

MAP Network

Map the Azure VNET to your Local Network

When you protect the Virtual Machine you will see this in Azure :

Saving 1

And after this Hyper-V Replica to Azure is replicating the VM to the Microsoft Cloud :

Saving 2

When the Sync is completed we can make an Azure Recovery Plan :

Recovery Plan

How to migrate VM from 2008R2 to 2012R2

Upgrading to the stand-alone product “Microsoft Hyper-V Server” is not supported, however importing VMs via the migration techniques outlined in this article is supported.

Since in-place upgrades of server operating systems is not something many administrators like to do for various good reasons, a simpler way to upgrade the Hyper-V infrastructure is to simply blow away the current operating system, then install Server 2012 fresh on the hardware.  The following steps will describe the process of upgrading the infrastructure without upgrading the OS in place. Before getting started there are some really important file locations we need to take note of:

• VM Config (XML) files

• VM Data (VHD) files

• VM Snapshot (XML) pointer files

It is wise to remove, revert, or apply(depending the individual scenarios) all snapshots prior to proceeding. however it is not required.

Notice first that by default in 2008R2, the VM Config and Snapshot files are located in a separate place from the Disk files. (ProgramData\Microsoft\Windows\Hyper-V)

image

The Virtual Disk files are located in by default in another folder (%Profile%\Documents\Hyper-V\Virtual hard disks), hopefully in production these files are located on centralized or some physical disks other than the profile directory:

image

We are now assuming that a Windows Server 2012 instance is available for us with Hyper-V enabled.  If you have not prepared the server yet you can follow along the lab guides found here to get started, skipping the steps for booting to a VHD of course.  So what we want to do is consolidate the folders shown above to a LUN or separate disk than the operating system, then copy them to the target server or mount the LUN that includes the contents,  so that effectively we end up with this collection of subfolders together available on our target Hyper-V system:

image

Next we will want to launch the Hyper-V Manager and click on “Import Virtual Machine”

image

Browse to the location and select the “Virtual Machines” folder:

image

You should be presented with a list of VMs ready to be imported:

image

At the next screen we are asked to choose one of three options.

Register – Assumes that all files exist in this consolidated folder and that the files will continue forward residing in this folder

Restore – Registers the VM configuration files in their current location and copies the other necessary files to new location

Copy – Copies all VM files to a new location for the VM to continue forward running in the new location

For simplicity sake I will leave these VMs in the same folder, however best practices would tell us to make sure the disk files are stored on the fastest disk possible, and normally set away from the hypervisor and applications directories.

image

Now because we are adding virtual machines to a new server it is important to point out that prior to booting any of these virtual machines we will want them pointed to the right virtual switch.  Fortunately the Import Wizard will ask for this.  If you have not setup the Virtual Switches to match the source Hyper-V servers, now would be a good time to do so, then proceed with importing the VMs.  Notice that all of the Virtual Switches appear in the drop down menu.  This will happen for each network card found in the VM.  Once you have selected a switch for each network card the Wizard will proceed to the next step.

image

Finally you will see a summary page for the Import process about to take place.

image

You should now see the VMs in Hyper-V Manager ready to start up.  Take a look at the properties for each if you want to be sure that everything imported properly.

image